
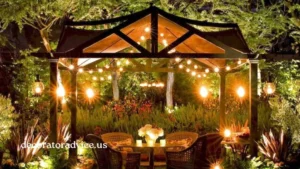
Lighting can make or break an outdoor space. If you want your covered patio to feel cozy, stylish, and ready for anything from casual dinners to late-night conversations, string lights are one of the easiest and most effective upgrades you can make. They bring instant charm, elevate the atmosphere, and add practical illumination after sunset.
But hanging them the right way, not just throwing them up, can mean the difference between a polished look and a tangled mess. This guide walks you step-by-step through the process of hanging string lights on a covered patio, so your space looks intentional, secure, and picture-perfect.
Step 1: Choose the Right Lights
Before hanging anything, decide on the type of string lights that fit your vibe and budget.
Types of string lights:
-
Globe lights: Soft glow, popular for ambiance.
-
Edison bulbs: Vintage look, warm and moody.
-
LED string lights: Energy-efficient, available in many colors.
-
Fairy lights: Delicate, best for subtle decoration.
Make sure your lights are rated for outdoor use and check if they’re plug-in or battery/solar-powered based on your patio’s power access.
Step 2: Map Out the Layout
The way you hang your lights matters as much as the lights themselves. Sketch out your patio and visualize where you want the lights to go.
Common patterns:
-
Zig-zag or V-pattern: Popular and eye-catching.
-
Perimeter: Outlines the patio for a clean, defined look.
-
Parallel lines: Great for modern or symmetrical setups.
-
Fan or spoke pattern: Lights radiate from a single central point.
Use painter’s tape or string to test different layouts before committing.
Step 3: Measure and Gather Materials
Measure the space according to your chosen pattern. Add a few extra feet to allow for draping and slack.
You’ll need:
-
Outdoor-rated string lights
-
Hooks, clips, or cup hooks (preferably stainless steel or rust-resistant)
-
Zip ties or twist ties
-
Ladder
-
Tape measure
-
Drill (if screwing into wood or metal beams)
Step 4: Install Anchor Points
If your covered patio has beams, rafters, or posts, these are perfect natural anchor points. If not, you may need to install eye hooks or wall anchors.
Tips:
-
Space hooks evenly based on your layout.
-
If using cup hooks, pre-drill holes to avoid splitting wood.
-
For brick or concrete, use masonry anchors.
If your lights are heavy or you’re stringing across wide spans, consider using guide wire to support the lights and prevent sagging.
Step 5: Hang the Lights
Start from the power source and work your way out. Use hooks to support the cord or sockets—not the bulbs.
How to secure them:
-
Hooks or cup hooks: Best for permanent setups.
-
Adhesive clips: Great for temporary or no-drill installations (just check weight limits).
-
Zip ties: Useful for tying lights to existing structures like beams or rails.
Keep the lights slightly slack to allow for movement and reduce tension on the cord.
Step 6: Plug In and Test
Once everything is up, plug in the lights to check for any bulb issues or weak spots in your setup. If you’re using multiple strands, ensure the wattage doesn’t exceed your circuit’s limit.
For a clean look, conceal cords using cable covers or run them along trim or siding.
Bonus Tips:
-
Use a timer or smart plug to automate your lights.
-
Combine with dimmers for adjustable ambiance.
-
Avoid low-hanging bulbs in high-traffic areas.
-
Use weatherproof extension cords if needed.
-
Clean the bulbs regularly for the best brightness.
Conclusion
Adding string lights to your covered patio is one of the easiest and most rewarding upgrades you can make. With the right planning and setup, you can transform your space into a cozy retreat that feels stylish, functional, and welcoming. Whether you’re hosting dinners, enjoying late-night conversations, or simply unwinding after a long day, good lighting elevates the entire atmosphere.
The key is to treat the process with intention. Choosing the right type of lights, mapping a layout, and securing everything with proper anchors ensures your patio looks polished rather than cluttered. Using outdoor-rated materials and safe installation methods not only keeps the setup durable but also gives you peace of mind. Small details like adding dimmers, timers, or smart plugs can further enhance convenience and ambiance.
At the end of the day, string lights aren’t just about illumination—they set the mood. Done well, they’ll turn your covered patio into a picture-perfect space you’ll love using year-round.
For more Updates about home décor, also read decoratoradvice.